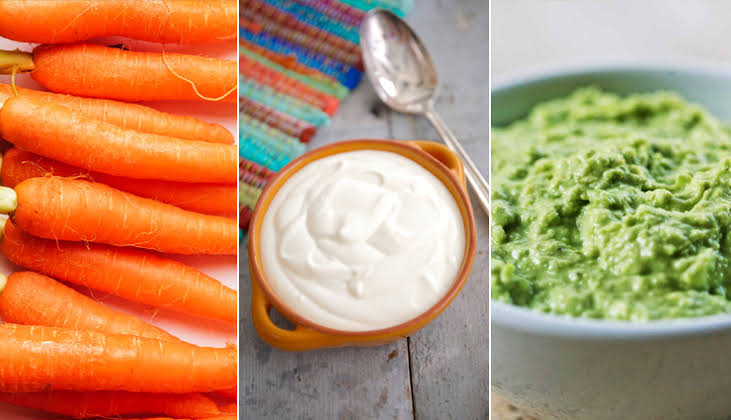
Carrot and avocado mask for dry skin
This great mask for dry skin contains just a few of our most popular ingredients. Among the components of this mask are antioxidants, which greatly help in combating aging. Carrots are also rich in potassium, which prevents skin dryness and has anti-inflammatory properties, which helps revitalize the skin. Follow with us the steps of this mask in order to enjoy fresh skin free of any dryness.
* Ingredients:
– 1 peeled and mashed carrot.
– 1/2 of an avocado.
– 1 tablespoon of honey.
– 1/2 tablespoon of olive oil (ie
Oil can do the show (except vegetable oil or coconut oil)
– 1 teaspoon of lemon juice.
– 1 egg yolk
* How to prepare :
– Flatten the carrot by steaming or boiling so that it is easy to mash.
Mash the carrot with a fork until it becomes creamy, or put the carrot in a blender until it forms a paste.
Mash the avocado with carrot pulp.
Note: The avocado must be well ripe
Hard to mash with a fork. In this case, I recommend putting unripe avocados with
Carrot in the blender until it is blended.
Then add honey, lemon juice and egg yolk and mix these ingredients well by hand.
Then spread the mask on a clean face for 15 minutes.
During the waiting period, you can mash the remaining half of the avocado with lemon and sea salt and enjoy it as a snack while you are waiting for the mask to finish.
Finally, wash your face from the mask with a warm cloth and remove the dry skin with it, then apply the moisturizer.
Top 6 Benefits of Sulfur Soap
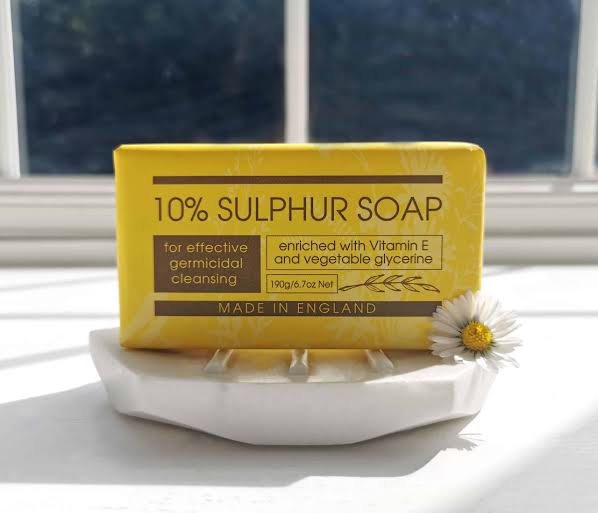
The word sulfur may remind you of science lessons, but this element is actually the basis of natural medicine. It has been used for centuries to help treat acne and other skin problems, thanks to its antimicrobial properties. It’s also easily accessible content. Sulfur is especially commonly found in sulfur soap, various acne products, and some prescription medications.
Read on for the sulfur soap benefits and any questions you may have about it.
What is sulfur soap?
Sulfur soap is a skin cleansing product with numerous health benefits. The benefits of sulfur soap can range from treating skin disorders to effectively cleansing your skin. Sulfur soap is also found in shampoos, lotions, and creams. Understanding the benefits of sulfur soap is essential for determining whether using it is a good choice for you.
What are the properties of sulfur soap?
Sulfur soap products are usually formulated with a sulfur content of about 10%. The rest of the soap is made from a neutral soap base and fragrance to cover up the sulfur smell. Due to sulfur’s ability to dry out the skin, it is used to treat common skin problems alongside its antibacterial and antiseptic benefits.
What does sulfur soap do?
Sulfur soap works just like benzoyl peroxide and salicylic acid But unlike other acne-fighting ingredients, sulfur tends to be kinder to your skin.
Sulfur dries the surface of your skin to help absorb excess oil that can contribute to acne breakouts. It also dries out dead skin cells to help unclog pores. This is why some skin care products contain sulfur along with other acne-fighting ingredients.
What are the benefits of sulfur soap?
We briefly mentioned that sulfur soap has benefits for the skin. Read on for a closer look at these benefits.
acne treatment
One of the properties of sulfur is that it causes drying and peeling of the skin. When acne occurs on your skin, your skin is more moist and oily than normal. Since sulfur dries the skin, it helps reduce the inflammation of acne and other blemishes on your skin. It can also contribute to reducing the appearance of whiteheads on the skin by reducing oiliness and preventing clogging of pores.
seborrheic dermatitis
Seborrheic dermatitis is a skin problem caused by fungi that grow on the skin and can make the skin oily, red, scaly. This skin disease can occur in many parts of your body, including your face, chest, armpits, and hairline. Sulfur soap helps to eliminate the fungus, which can contribute to the treatment of seborrheic dermatitis.
rose disease
Known as rosacea, rosacea is a chronic skin condition that causes redness, blemishes, or swelling on the cheeks, forehead, chin, and nose. It can also occur on the scalp, chest, neck, and ears. If this condition is left untreated, the redness becomes persistent and bothersome. With its drying ability, sulfur soap can help reduce redness and relieve rosacea flare-ups on your skin.
scars
If you have a history of acne, you are likely to have acne scars on your face. They can vary in color and size, but they have one thing in common: They are quite difficult to get rid of. It can also theoretically reduce the appearance of scars, as sulfur dries out the skin and removes dead skin cells.
scabies treatment
Scabies occurs when microscopic mites bury themselves under the skin. This causes itching, pain and redness. Sulfur soap can kill these mites. This makes it an effective way to get rid of scabies. Of course, you should first consult your doctor for skin diseases, including other serious conditions such as scabies.
Ringworm
Ringworm is a skin rash caused by a type of fungus. It often appears as a red, ring-shaped rash with a clear center. It causes itching and hair loss in that area. It can be spread through direct skin contact with an infected person or animal. Sulfur soap can help alleviate the condition (remember you should see your doctor first).
How to use sulfur soap?
As you can see, the benefits of sulfur soap for the skin are endless. To reap the benefits of sulfur soap, you can use it daily. This type of soap is also very gentle for you to use on your face. When it comes to cleaning the skin with soap, the smell of sulfur soap can be offensive. But don’t worry, the scent doesn’t stay on the skin for long and fades easily after washing.
Masks for oily skin with natural ingredients
Oily skin requires great attention, so what do you think about offering you masks for oily skin that are very beneficial and take care of it, because oily skin easily collects dirt from the atmosphere around you, and is more prone to acne, as oily skin tends to release additional natural oils, so It needs extra care to keep it clean.
Masks for oily skin
Excess oil production on your face, forehead, nose and chin is due to open skin pores, and oily skin can lead to many skin problems, such as acne, spots, blackheads and greasy lines on your face, and in this article we will give you face masks that help narrow the pores of the skin. And the stability of the production of natural oils or so-called sebum.
1. Banana Mask for Oily Skin:
This face mask is soothing and works best on oily skin.
Method:
- Take 1 fully ripe banana, and 1 tablespoon each of honey, orange or lemon. You can keep a ripe banana in the refrigerator and use it later.
- Mash the banana and add the honey. Alternatively, you can mix it all in a blender, and add a few drops of orange or lemon juice.
- Apply the mask to your face and leave it for 15 minutes before rinsing it off, then drying it with a soft towel and using an appropriate moisturizing cream.
2. Green clay for oily skin:
Green clay is a great face mask for oily skin, and the best clay masks are green clay.
Ingredients:
1 tablespoon of green silt
1 teaspoon of apricot kernel oil
3 drops of essential oil
Method:
- Mix these ingredients together, adding a few drops of warm water if needed.
- Add a little warm water to make the mixture firm.
- Apply this mask on the face and leave it to dry for 10 minutes.
- Rinse it with lukewarm water and dry it well with a towel.
3. Flour is the best mask for oily skin:
Ground flour is a very good mask in absorbing oils and dirt from the surface of oily skin, and ground flour is an ancient natural remedy for acne and pimples, and it acts as a natural antiseptic and is very effective in getting rid of acne.
Method:
- Soak 2 tablespoons of ground flour in warm water for half an hour.
- Add 1 tablespoon of rose water and a few drops of lemon juice to the mixture.
- If you feel that the mixture is still thick, add some warm water to make it smooth, and you can also add a tablespoon of milk to prevent dehydration.
Note:
This is the best mask for cleaning the face, getting rid of oils, impurities and dead cells from your skin, and you can apply this mask two or three times a week.
Tip: To make this simple mask, mix flour with water if you have oily skin, jojoba oil if you have dry skin, and milk to get fresh skin and it works for both dry and oily skin.
4. Gram flour, turmeric, lemon juice and milk for oily skin:
Gram flour and turmeric together make a very effective mask for oily skin.
Method:
- Take 2 tablespoons of gram flour, with 2-3 tablespoons of milk and add water as needed.
- Mix these ingredients well to form a paste that is easy to spread.
- Apply this mask on your face, and leave it for about 20 minutes.
- Rinse it with lukewarm water and dry the skin well.
Note: This mask deeply cleanses the skin and gets rid of dead skin cells. This mask works on oily skin as a natural facial exfoliator.
Warning: Turmeric may not be preferred by people with fair skin, and is an ideal mask for people with darker skin.
5. Orange peel mask: Orange
peel is an effective natural remedy for managing oily and oily skin.
Method:
Dry orange peels in the shade and then grind them into a powder, and mix the powder with water or milk to form a face mask.
Note: The orange peel mask opens and cleanses clogged pores, while its astringent properties remove excess oil from the skin.
6. Fruit masks for oily
skin: Oily skin benefits in many ways through the application of lemon, orange, tomato, grapefruit and papaya, as it is rich in vitamin C and contains mold oils that treat oily and oily skin, and the natural astringent components of this fruit work to tighten the pores of the face. , reduce the secretion of oils and keep your skin clean.
Caution: Many people have oily areas only on the forehead, nose and chin, such people should only apply these masks to the T-zone, and do not apply to dry areas of your face, as you will suffer from drier patches.
7. Tomato masks for oily skin:
Tomato masks are very useful for managing oily skin, because they help dissolve extra amounts of oil and at the same time reduce the size of large pores. It is a natural astringent and is an ideal choice for oily and shiny skin.
The simplest form of a tomato mask is to just mash the tomato, put it on the oily face area for 15 minutes, and repeat this mask on the face two or three times a week to make your skin healthy, free of acne.
8. Lemon juice to control oily skin problems:
It is a fact that the application of lemon juice irritates the skin, but also the fact that lemon juice is very effective in solving oily skin problems, as it is rich in vitamin C, such as tomatoes and papaya and therefore it is very beneficial for oily skin, and it has Other benefits of whitening the skin and making it free of impurities and blemishes.
People with oily skin are prone to suffer from acne, pimples, and blackheads, and you can add lemon juice to any oily skin mask to treat all oily skin problems, and by using these masks you can make your skin clearer, free of oils, dirt and impurities.
In its simplest form, you can apply fresh lemon juice to the oily areas of your skin to clean it and get rid of the oily layer. For those who also feel that their body is oily, the juice of half a lemon can be added to the bathtub to remove excessive oil from the skin.
9. Papaya mask to remove oil from your skin:
Although the papaya mask is known to suit all skin types, but it benefits oily skin more than others, especially, as papaya is very effective in removing excess oil from the surface of the skin, and oily skin of the type that Frequent exfoliation is required, and papaya contains enzymes that aid in the exfoliation process.
- If oily skin is accompanied by pimples and scars, the papaya mask works best, and using a papaya mask regularly on your face gives you many benefits, including youthful skin, reduced wrinkles and no skin discoloration.
Method:
- Mash a piece of ripe papaya in a bowl, and apply it to your face and neck.
- You can also mix a few drops of lemon juice in this mask.
- Papaya mask for oily skin not only helps remove excess oil from your face, but also is a true friend to providing healthy skin and skin.
10. Oatmeal, lemon juice and honey mask for oily skin:
This mask is very effective for oily and oily skin as it exfoliates the skin and removes excess oils and dead skin.
Method:
- Simply combine oats, honey and lemon juice.
- Apply this mixture on your face, taking care to avoid the areas around the eyes.
- Leave it on your face for 10 minutes, then rinse it off with warm water.
- Dry the face with a soft, absorbent towel.
- Use this natural remedy once a day, or as often as you need to keep your skin sebum-free, smooth and soft.
11. Cucumber Mask for Oily Skin:
Ingredients:
Half a cucumber,
egg white
, 1 teaspoon lemon juice,
1 teaspoon mint.
Method:
- Mix all ingredients in a blender and keep in the refrigerator for 10 minutes.
- Apply the mixture on your face, taking care to avoid the area around the eyes.
- Leave it for 15 minutes, then rinse it with warm and then cold water to maintain the freshness of the skin.
12. Apple and Honey Mask for Oily Skin:
Method: Peel the apples, remove the seeds, mix them, add 3 tablespoons of honey, and stir the mixture well. Apply it on your face and leave it for 10 minutes, then rinse it off with warm water.
13. Glycerin, lemon and rose water mask to moisturize oily skin:
Lemon has anti-bacterial properties, so it is an ideal natural choice for treating acne for oily skin. Lemon also helps remove oils from the surface of the skin, and rose water acts as a disinfectant to make your skin clean and fresh as well. And glycerin moisturizes the skin while getting rid of oils and excess sebum.
Method:
- Mix these natural ingredients in equal proportions, and put them on your face.
- Leave it on for about 20 minutes, then wash it off.
- You can store this mixture in a bottle and use it in your daily skincare routine.
14. Witch hazel and apple cider vinegar for oily skin:
It is a known fact that there are many masks that witch hazel uses to control oily skin, and we give here a natural recipe for oily skin and blackheads, and we do not recommend this recipe for people with dry skin.
- Apples are rich in vitamins A, B and C, which makes this homemade recipe an antioxidant for your skin.
Witch Hazel: Witch Hazel reduces inflammation, removes makeup, brightens skin tone, helps get rid of excess sebum and oils from the skin and some people see it as controlling blackheads, etc. It has incredible benefits for acne-prone skin, pimples, oily skin and more. to shine.
- Apple cider vinegar works very effectively in relieving inflammation, and it is an ideal natural choice for women who suffer from psoriasis and other skin diseases, as it helps get rid of acne and blackheads.
Ingredients:
1 green apple
1/4 cup witch hazel,
4 cups apple cider vinegar,
1/2 cup water.
Method:
- Cut the apples into small pieces and put the apples and water in a saucepan and bring the heat to a boil, then leave this mixture to cool.
- Strain the mixture into a spray bottle or regular bottle, using a gauze pad, mix the ingredients well and shake the bottle well.
- Apply this mixture to your face, neck and chest using a cotton pad or alternatively use a spray bottle.
- Leave it on for 10-15 minutes, then rinse it off with warm water, then use a good quality moisturizer on the skin to moisturize
Glycerin and rose water face mask
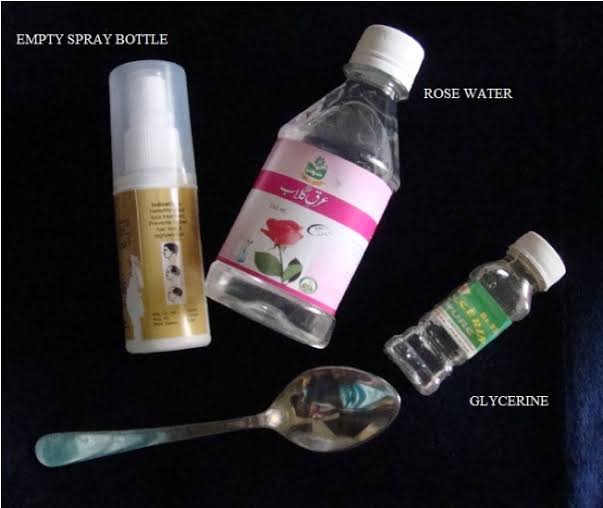
- Do you want to know the secret to having smooth and beautiful skin?
A mixture of glycerin and rose water for the face is what you need. For centuries, glycerin has been used all over the world as a wonderful skin toner and when added with glycerin helps you get healthy and radiant skin.
These elements have moisturizing properties that provide hydration to the skin and make it look healthy and glowing.
The mixture of glycerin and rose water has moisturizing properties for the outer layer of the skin. It is an excellent ingredient that is easily absorbed by the skin, and glycerin is a nourishing element such as lecithin and rose water. This mixture is exceptional and has been included in many different beauty products on the market. Glycerin is a colorless, sweet-tasting viscous liquid, while rose water is colorless and made from rose petals, both of which are non-toxic and have been used in many food items and cosmetics.
How to use glycerin and rose water for the face
You can use a mixture of glycerin and rose water together to get a bright and shiny face easily and take advantage of these nutrients for the skin:
1. Moisturizing the face:
As mentioned above, glycerin and rose water have moisturizing properties, which makes it a particularly beneficial ingredient for those with dry skin. Glycerin is also an excellent moisturizing and nourishing ingredient. Because it helps to increase skin hydration and ease the skin’s retention of moisture, and this makes the skin always smooth and soft.
2. Solve skin problems:
Because this mixture is great for dry skin, glycerin and rose water can be used to treat skin diseases such as eczema and dermatitis. . Because it helps you in removing dry and rough skin easily, which is a group of problems facing the skin. It also helps reduce skin irritation, inflammation, and redness. In addition, the mixture of glycerin and rose water works well for oily skin, making it an effective way to protect against acne, pimples, and other oily skin problems. Rose water has natural antiseptic and astringent properties which makes it a good ingredient for getting rid of acne and pimples.
3. Balance the acidity of the skin:
One of the most important things to have healthy skin is to balance the pH of the skin. When the pH level of the skin is unbalanced, it results in various skin diseases including skin disorder, acne, eczema, etc. Both glycerin and rose water work to achieve the pH level of the skin and eliminate various skin defects, allowing you to get glowing and healthy skin Throughout the year .
4. Make-up remover :
If you spend more money on the purchase of makeup removers. There is a simpler and cheaper way, which is to use rose water to remove makeup, as it is incredibly effective, especially eye makeup. It does not cause any irritation to the skin in addition to helping you to keep the skin smooth.
5. After hair removal :
One of the most important benefits of rose water for the skin is that it has anti-inflammatory properties, which make it an ideal ingredient to calm the redness caused by excess hair removal and various skin infections. Dermatologist Rachel Nazarian in New York City states that if you experience any irritation or inflammation after hair removal, use a little rose water to provide instant relief.
6. Skin Rejuvenation:
You do not need cosmetic products to resist obtaining a renewed and radiant skin. Rose water and glycerin contain the most effective ingredients when you want to have a radiant skin, as it helps you delay the appearance of signs of aging and wrinkles. When you mix rose water with glycerin, you can get soft and smooth skin, because when the skin gets the hydration and nutrition it needs, it regenerates by itself.
All you need is to take equal amounts of glycerin and rose water and make a mixture to apply it to the skin and provide a lot of benefits to your skin.
7. Control of Excess Oil Production :
If you have oily skin, you suffer from excess oil production, and to control this problem, you can use rose water to control oil secretion. You can make a soft paste and apply it on the face for 20 minutes and then wash the face to clean the pores and control the secretion of excess oil. You can apply it 2-3 times a week.
8. Clean the skin:
Facial cleansing is an essential part of your skin care regimen. And after washing the face with a face wash intended for you. Make sure to use one tablespoon of rose water and add a few drops of glycerin, then apply this mixture on the face using a cotton swab. This mixture is the best cleanser for all skin types, as it enables you to eliminate dirt and dust that accumulate on the face and deeply nourish the skin. Also, you can use it with honey as an antiseptic.
9. Skin Rejuvenation:
In the summer, we need to feel the freshness of the face, especially with the high temperature. Rose water adds shine and luster to your skin. You can keep a bottle of rose water in the refrigerator to spray the face with it several times throughout the day.
10. Anti-aging:
Did you know that skin aging increases with increased exposure to UV rays, pollution, frequent skin care products, especially those that contain harsh chemicals, stress and an unhealthy diet.
All of these factors harm the health of your skin because it leads to the generation of free radicals that work to achieve cell damage, and you can get rid of the resulting damage by using the antioxidants found in rose water. But rose water is not a substitute for anti-aging creams.
Doing your own mix by mixing glycerin and rose water will give you more wonderful benefits, which is what your skin needs to get glowing and healthy skin day after day.
11. Moisturizing the skin:
Winter is the worst time for your skin because it makes the skin dry and rough which is why you should look for a homemade moisturizer. Mixing an amount of glycerin with rose water works wonders for your skin. You can apply it on the face or all over the body to protect your skin from harsh conditions.
12. Skin Toner:
You can use glycerin with rose water as a skin toner mixture that helps eliminate skin imperfections completely. As we mentioned, the mixture helps you to balance the pH level of the skin. And when using a mixture of glycerin with rose water as a toner, you must make sure that your skin is well nourished in order to get a glowing skin.
13. Clean the skin:
One of the best ways to get healthy skin is to prepare a homemade cleanser. You can make your own cleanser with a mixture of glycerin and rose water. . This cleanser enables you to clean the skin from the impact of make-up, dirt and other impurities that eventually lead to clogged pores.
You can dilute the glycerin before using it, and the best way to dilute the glycerin is to dilute the glycerin in rose water so that you can get the benefits of both.
It should be noted that glycerin is viscous and it is not recommended to use it with other sticky creams. Any glycerin on the skin must be erased before applying the cream so as not to eventually lead to the accumulation of dust and other impurities on the skin. . You can take one bottle of glycerin and pour 200-250 fillings into a bowl and add about 100 ml of rose water and mix them well. For more benefits, you can mix 2 teaspoons of lemon juice and apply this mixture on your skin at night.
To make the toner at home, all you need is 1/4 cup of glycerin and 1.5 cups of rose water, mix them well and store it in a spray bottle that you can use anytime you need it on your skin
Make it yourself free and inexpensive lotion for oily skin
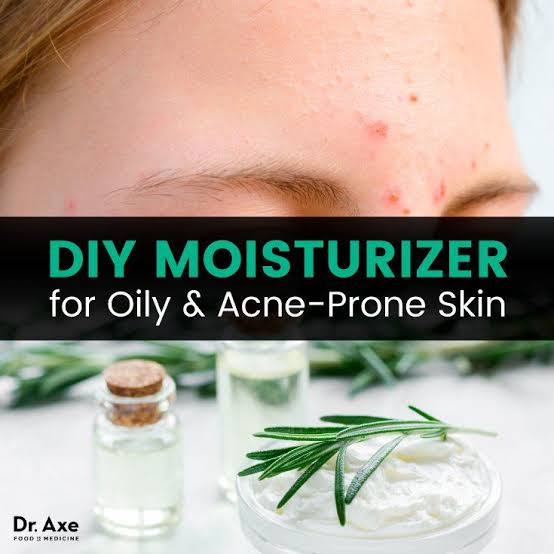
Instead of buying a lotion for oily skin at high prices, you can make many types yourself at home, according to the possibilities available in your kitchen.
There are certainly a few advantages of oily skin, but there are many disadvantages that cannot be ignored.
You can prepare an oily skin lotion to prevent the problems caused by oily skin because it reduces the deep impurities and dirt that are found on the surface of the oily skin and reduces the fat in the skin without leaving the skin dry and fighting acne bacteria so that it does not lead to clogged pores.
The best way to avoid oily skin problems is to make a home lotion that you can control its natural ingredients and leaves the oily skin clean. If you have oily skin, you need to use makeup powder, be sure to wash your face to get rid of grease, you should always carry paper towels with you.
What is the cause of oily skin?
The skin becomes oily when you suffer from an overactivity of the sebaceous gland in the body because the body produces excess sebum. There are many factors that cause oily skin, including dietary choices, genetics, medications, hormonal changes, stress, the menstrual cycle, and the overuse of skin care products.
- Genetics: Genetics play a role in having oily skin, and if one of the family members suffers from oily skin, it is likely that you will also suffer from oily skin. Researchers have discovered that hyperactivity of the sebaceous gland is a genetic disease.
- Of the hormonal changes: Throughout the lives of women suffering from hormonal changes in the age of puberty, the period of pregnancy, the stage of interruption of the menstrual cycle, all of these factors result in excessive fatty gland activity. For example, androgen hormones are responsible for the production of sebum and are known to be active during puberty. If you think that androgen hormone is a male hormone, this is wrong. Because androgens affect women as well and are found in a higher amount in a woman’s body. This hormone stimulates the production of excess sebum, clogged pores. Similarly, androgen levels increase before menstruation and this is the reason why acne appears before menstruation begins.
- A weather: humidity or high temperature in the summer increases the production of skin sebum especially in the summer because of the sweat become more oily skin.
- A drugs: You can blame oily skin on the drugs because drugs prevent pregnancy increase oily skin because they occur a change in the level of body hormones and thus oil surplus has more than one side , and similarly there are drugs cause dehydration can lead to a surplus known oil.
- Stress: When you suffer from stress and tension, the body releases the hormone cortisol, and it is known that cortisol leads to the activity of the sebaceous glands.
- Excessive use of skin care products: Many women tend to use skin care products to get cleaner and smoother skin. But you may end up increasing oil production.
- Medications that are not necessary for skin care: Never use harsh skin lotion and do not try to apply more pressure because rubbing leads to skin irritation and makes the skin excessively dry and this causes the activity of the sebaceous gland.
Lotion for oily skin
Benefits of the natural ingredients used in the lotion:
Chickpea or besan flour both absorb excess oils in oily skin. It also works on gentle exfoliation and even removal of dead cells to clean and renew skin cells.
Turmeric powder and lemon peel: These ingredients help you in lightening the skin, resisting dirt and having anti-aging properties.
Tea tree oil: The best thing for acne-prone skin is tea tree oil because it helps control oils and eliminate pimples.
You will need:
- 5 tablespoons of Moroccan clay.
- 10 tablespoons of chickpea or besan flour.
- 1/2 teaspoon of turmeric.
- 1 tablespoon of neem powder.
- Lemon peel powder.
- 5-10 drops of tea tree oil to fight acne.
Method:
- Mix all the natural ingredients together and store them in an airtight container in a cool, dark place.
- Wash the face with normal water.
- Take a small amount of oily skin lotion between the palms of your hands and put a few drops of water on it, enough to spread the paste in the palm of your hands.
- Gently massage the paste on the face in circular motions and spend more time to leave these ingredients on the face for about a minute.
- Rinse the face with water and leave it to dry on its own and the tissues become more soft.
How long will this mixture be stored?
You can store face wash for 1-3 months. But the necessary precautions must be taken, such as placing it in a dry place away from water, because the water leads to the growth of bacteria and fungi in the mixture, and remember to put it in an airtight container and after each use you can put it out of reach of the faucet.
2. Coconut Oil and Honey Lotion:
This lotion could be the best suitable lotion for oily skin. Coconut oil and honey have antibacterial and antifungal properties that will help fight the oil. They are easily available components that you can prepare yourself.
Ingredients :
- Get 1-2 teaspoons of coconut oil.
- 1 small spoon of honey.
- 1 teaspoon of baking soda.
- Sealed container.
Steps:
- First, pour the coconut oil into a small bowl and take a small spoon to stir. If the oil is dry and firm, you can stir with a warm spoon.
- Then add honey and stir. And soak the ingredients to a bowl and store at room temperature.
- Do not worry if you feel the mixture hardening. It will melt when you apply it to the skin. Now add 1 hanging of baking soda and transfer it to a bowl, then take a small amount of the mixture and start applying it on the face and neck and massage in a circular motion, giving it time until the skin absorbs it, then remove it with warm water and dry it. Face with a clean towel.
3. Honey and Lemon Lotion:
The mixture of honey and lemon can do wonders for your skin. Honey is a good moisturizer for your skin and makes it very supple. It is a natural cleanser for all skin types, including oily skin. You can even remove makeup easily with honey. All you have to do is add baking soda and lemon juice to act as a natural wash. Lemon provides you with vitamin C, which helps you get healthy and glowing skin.
Ingredients :
- 1 tablespoon of lemon juice.
- 1 small spoon of honey.
- small bowl.
- warm water .
Steps:
- Squeeze the lemon to extract the juice and store the juice in a bowl.
- With the addition of a small spoon of honey and add it to the warm water so that you can distribute it on the skin easily.
- Apply the mixture to the skin and leave it for 20 minutes, then rinse the face with plain water.
4. Apple Cider Vinegar Lotion for Oily Skin:
A little apple cider vinegar with warm water can do miracles for you. Apple cider vinegar kills bacteria and balances the pH of the skin. It is a great astringent for the skin, thus drying the excess oil well. However, too much apple cider vinegar makes your skin excessively dry.
Ingredients :
- 1 liter apple cider vinegar.
- A piece of cotton.
- water .
Steps:
- At first, wash the face and leave it to dry.
- Now, using a piece of cotton, you can put a piece of cotton inside the mixture and massage the face with it, leaving it for 30 minutes before washing the face well.
5. Tomato and honey face wash:
A simple slice of tomato reduces oily skin because tomato is an astringent and has lightening and cooling effects for the skin. Tomatoes absorb the excess oil and leave the skin clean, in addition to being rich in vitamin C, which helps in obtaining acne-free skin.
Ingredients :
- 1 medium sized tomato.
- 1 small spoon of honey.
Steps:
Cut the tomatoes in half and rub the face and neck with one of them, while allowing the juice to be left on the face and neck for at least 15 minutes, then wash the face with lukewarm water.
6. Cucumber:
Cucumber helps you fight the extra amounts of oil, thanks to its soothing and astringent properties because it is rich in vitamins, minerals, magnesium, potassium, vitamin A, vitamin E.
Ingredients :
- 1 medium size option.
- Half a teaspoon of lemon juice.
Steps:
- Cut the cucumber into thick slices and now rub the face with these slices.
- In the morning, wash the face with warm water.
- You can do these steps every day before bed as it is a great lotion for oily skin.
6. Milk:
Milk increases the freshness of the skin. It is a wonderful cleanser for oily skin because it is rich in alpha hydroxy acids that gently exfoliate the skin and maintain the pH balance.
Ingredients :
- 2 teaspoons of milk.
- 2-3 drops of sandalwood oil.
Steps:
- Mix the ingredients together and mix them well. Now, using a piece of cotton, you can apply the mixture on the face and neck with a gentle massage.
- Leave the ingredients on the face at night, then wash it with cold water in the morning.
- You can use this mixture to wash oily skin every day.
7. Aloe vera:
Aloe vera is known to have antibacterial properties. These properties make it a great choice for treating acne caused by oily skin. Aloe vera is effective in absorbing excess oil from the skin and using this mixture as an effective treatment.
Ingredients :
- Get a leaf of aloe vera.
- Cut aloe vera leaf and extract the gel.
- Apply the gel to the skin and wash it off as soon as it dries on its own.
- You can also mix aloe vera gel with honey to make a mixture and apply it to the face and neck
Ways to deeply clean the skin and restore its freshness
Clean and blemish-free skin is desirable. Hundreds of skin care products have appeared that claim to deeply cleanse the skin, while you can rely on natural ways to deeply cleanse the skin to restore its youthfulness. Surveys indicate that women as well as men spend thousands of dollars each month to improve skin texture and get beautiful skin. Unfortunately, most commercial skin products are nothing more than a commercial scam and an unnecessary expense. It is better to resort to home remedies and herbs that are free of chemical elements and annoying side effects.
Here are some useful home remedies in achieving beautiful skin without much effort. Because the skin is exposed to dust, dirt and normal oil secretions, dead cells. Washing your face daily is of course the best way to keep your skin clean, but simply regular cleaning is not enough, the skin needs a deeper cleaning to enable you to easily restore its freshness.
Ways to deeply clean the skin and restore its freshness
1. Steam:
Steam can be one of the effective ways to clean the skin in depth because it depends on gently opening the pores, which in turn leads to the elimination of impurities in the skin. In addition, it is an inexpensive way when looking for a quick and economical way, even as it is cheaper than using nutrients.
- Get a clean hot water bowl and make sure that the water is clean and also clean the face by wiping the dirt and residues accumulated on it.
- Place the hot water bowl on a table of a suitable height for you. And sit in front of the table to sway in front of the bowl, covering the head with a towel. The steam from the water should be directed towards the face and the towel prevents the steam from escaping.
- It is preferable to continue exposing the face to steam for 5-10 minutes. You can take breaks between them if you feel very hot.
- Once the steam is finished, dry the skin well and relax for a few seconds before using a toner to tighten the skin if you have oily skin or moisturizing directly without using any toner or moisturizing using tea tree oil. It is preferable to do this once a week.
2. Peeling:
When you exfoliate your skin, you help get rid of impurities deeply and dry skin cells. Of course, there are a large number of exfoliation options, and one of the oldest methods is exfoliation using a dry brush. However, when you use a dry brush, try to have soft bristles made of natural fibers. Never use any other brush, not even the body brush, to exfoliate the skin because the face is very sensitive and fragile and the body brush is very harsh. So try buying a face brush.
- Clean the face using make-up remover, then wash it.
- Dry your face properly, as well as the brush, you must make sure that it is completely dry and clean, and it is preferable to have a circular brush to move it gently on the face.
- Try to focus on the areas of the skin that suffer from dryness. And be careful about cleaning around the eyes because the skin is very thin and you must be very careful while cleaning.
- After brushing the face, you can wash the face with cold water and use a face moisturizer.
3. Sugar scrub:
Use small granules to help you exfoliate the skin, and it is better to get a suitable skin scrub, especially for sensitive faces. Sugar is often the common ingredient when exfoliating the face, as it is one of the best natural exfoliation methods that give clear and clean skin.
- Get 2 tablespoons of sugar and prepare them to get a powder and add 1 teaspoon of lemon juice to it and mix enough to get a cohesive dough.
- Apply sugar paste on the face to clean it deeply and rub in a circular motion for 5 minutes, then wash with cold water and moisturize the skin.
4. Sugar, honey and green tea:
Take a few spoons of brewed green tea in a bowl and allow them to cool. Once it cools, add 1 tablespoon of sugar, 1 tablespoon of honey to it to get the consistency of a suitable paste.
Start by cleaning the face with this scrub and massaging in a circular motion, concentrating on the dry areas more. Keep the massage for 5 minutes, then wash the face with cold water and moisturize the skin.
5. Deep Cleansing Mud Mask for the Face:
Mud masks are one of the ways to deep clean the skin because it has excellent benefits in getting rid of impurities and dirt accumulated on the face and provides a more important benefit for people who have oily skin and makes the skin soft and glowing because it has lightening properties.
Mix a small hanging of clay with a sufficient amount of rose water to obtain a paste and clean the face with it, then leave the paste on the face until it dries. Once dry, wash the face with water.
An other way :
Mix the clay with a sufficient amount of oats and water to obtain a cohesive paste. Clean the face with the paste to apply this mask and leave it for 15 minutes, then wash the face and leave it to dry, then apply a suitable moisturizer for you.
6. Rose water:
Rose water has the properties of cleaning the skin naturally. It is a great cleanser for all skin types.. Experts recommend using it as a daily wash for the skin before going to sleep. Rose water is available in different shops, just by massaging the face with rose water using a piece of cotton and rubbing all over the skin completely and even the area behind the ears. Using a spray bottle, you can apply it directly to the face.
7. Egg mask:
Egg white has amazing benefits in tightening the skin and thus keeps the skin clean and has excellent properties in making the skin soft and supple, and if you suffer from acne, it helps you in providing deep cleaning of the skin.
Clean the face before applying the mask, and work to use 1 egg white on the face and leave it to dry. You may need to add 1 teaspoon of honey and leave the mask on the face until it dries. Once it dries, it is washed with water. You can repeat this once a week.
8. Oats:
Oats exfoliate dead skin cells and provide them with adequate hydration, thus maintaining optimal skin health. It adds antioxidants and anti-inflammatory, thus obtaining a radiant skin. Take 2 tablespoons of oatmeal and mix them with 1 teaspoon of lemon with 1 teaspoon of honey. All you have to do is mix the ingredients together to form a thick paste, adding a little water if needed. Apply this mask on the face and neck to get the desired results. It is preferable to leave the mask on for 15 minutes before rinsing the face with lukewarm water.
9. Parsley:
Parsley is one of the healthy foods and offers many beneficial properties for the skin. Where parsley helps in balancing the secretion of excess sebum. Thus, the presence of parsley on a regular basis becomes a blessing for oily skin that suffers from clogged pores and needs deep cleaning constantly. When parsley is applied directly to the face, it draws toxins from the skin and thus good cleaning and also reduces the appearance of acne and scars.
Wash and clean the parsley well and soak it in hot water and leave it in the water until it cools. When the boiled parsley cools, a towel is soaked in it and taken to get rid of the excess water. Then apply this cloth on the face for 5-15 minutes. It is preferable to repeat this daily.
10. Baking soda:
Baking soda is an inexpensive ingredient in deep cleansing, as it gently exfoliates and helps unclog clogged pores. Thus, it is a peeling and cleaning agent. Baking soda not only removes dead cells, dirt and other impurities but also helps balance the pH of the skin and this makes the skin look younger.
Mix enough water with 2 teaspoons of baking soda, apply the paste on the face and massage gently in a circular motion, then leave it for a few minutes on the face and wash with water until the baking soda gets rid of. You can do this once a week.
An other way :
Mix 2 tablespoons of baking soda with half a tablespoon of lemon juice, 4 tablespoons of honey and a teaspoon of cinnamon powder to make a paste. Apply this mask on the face and leave it for 5-8 minutes, then wash with water and repeat it once a week.
11. Lemon juice:
Lemon juice is an astringent for the skin and is used to tighten pores and clean the skin. In fact, it is the best natural remedy for deep cleansing of the face. Lemon juice contains citric acid, which exfoliates and removes dirt and prevents clogging of pores.
- You can rub the face with half a lemon and leave it for 5 minutes, then wash the face with lukewarm water.
- Pour lemon juice on a piece of cotton and use it to massage the face in a circular motion.
12. Natural oils:
If your face is prone to acne, you need to regularly clean the skin and use oils that contain a high percentage of linoleic acid, which is one of the natural elements that reduce the defects in the skin. You can try safflower oil, rose oil, avocado oil, or wheat germ oil. . They are nourishing oils that clean the skin and fight the signs of aging of the skin. Once you apply a sufficient amount of oil on your fingertips in a circular motion, hold a warm towel on the face and cover the face with it for a few minutes in order to open the pores, then wash the face with warm water.
13. Honey:
It is known that honey possesses anti-bacterial and anti-inflammatory properties and is a wonderful remedy for deep cleansing of the face and ultimately giving glowing and smooth skin.
- Just use raw honey to gently massage the skin and leave it for a while, then wash with lukewarm water and repeat it 2-3 times a week for deep cleansing of the face.
- Or add 1 teaspoon of cinnamon powder to 3 tablespoons of honey and apply this mask on the face and leave it for 20 minutes, then rinse with lukewarm water. Repeat this 1-2 times a week to keep the pores clean.
14. Jojoba Oil:
Jojoba oil helps you get rid of excess oil in the skin and clean it well. Just by applying an amount of jojoba oil to the affected skin daily and gently massaging it helps you clean the skin.
15. Turmeric:
Turmeric has been used since ancient times in cleaning the face and relieving symptoms of allergies and skin infections and is well useful in removing facial scars and cleaning the face of impurities.
Prepare a paste and pineapple juice in equal proportions and apply the thick paste on the face.
Mix an equal amount of turmeric with sugar cane juice to get a paste and apply it on the face.
16. Neem:
Neem is one of the home remedies that help you get rid of acne and clean the skin deeply because it has anti-bacterial and anti-fungal properties.
Put baking soda on lemon to get glowing skin
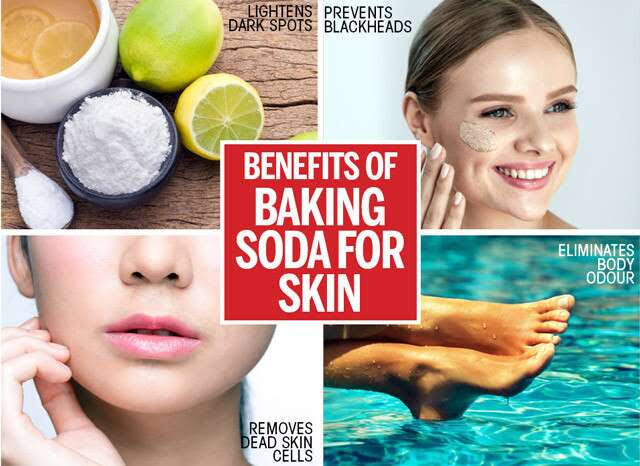
We all know the benefits of baking soda in the kitchen and the common use for it is to lighten teeth in three minutes using baking soda. But did you know that you can put baking soda on lemon to get great results for your skin? It is the first home remedy that you can resort to because lemon helps you relieve pimples and acid works to lighten the skin and thus get rid of blackheads. When baking soda is left on the skin, you can try this trick to get radiant skin.
Put baking soda on lemon to get glowing skin
One of the fastest ways to clean the skin and remove dead skin. Cut the lemon in half and put baking soda on half of the lemon and start rubbing the face in a circular motion and leave it for 5 minutes before rinsing the face with water. If you are sensitive to using lemon directly on the face, you can extract lemon juice and dilute it with water, and now add baking soda to the face and apply this mixture to your face.
Baking soda for skin:
Many people can use baking soda on the skin because it works as a daily cleanser and facial scrub. One of the most important results of using baking soda on the skin is that it made their skin look younger because baking soda removes dead skin cells, oil or dirt accumulated on the face, and this helps prevent clogged pores and prevent skin diseases such as acne.
You can simply use baking soda lotion by taking an amount of baking soda and placing it in the palm of your hands while adding warm water to the mixture to form a paste. It is preferable to take equal amounts of baking soda and water in order to get the right consistency. Gently wash your face with warm water and using your fingertips apply the paste all over the face before rinsing well using warm water and then applying a moisturizing cream.
Baking soda and coconut oil:
We have already mentioned that coconut oil is a great moisturizer for the skin and is one of the reasons why coconut oil is used in moisturizing baths. Coconut oil softens the skin and is especially beneficial for dry skin. It may also help treat eczema due to its anti-inflammatory properties. It is also one of the best burn treatments.
You need to determine your skin type and if you have sensitive skin you should use less coconut oil for baking soda and if you have non-sensitive skin you can mix equal amounts of the ingredients.
Working by simply mixing the ingredients together and applying it to your skin, you can leave the mask on the skin for a few minutes so that the skin can absorb the mask. Then wash the skin with warm water in a light circular motion.
Baking soda exfoliation:
You can simply take an amount of the face wash and use it gently when massaging the face in a circular motion before diluting it with warm water. You can make a thinner paste by making equal parts of baking soda and water, then add a small amount of oats and apply the paste on the face using your fingertips in a circular motion while massaging.
This recipe helps you reduce the appearance of dark circles under the eyes when applied directly under the eyes, but avoid contact with the eyes, you will notice the regeneration of the skin.
Baking soda with honey:
Honey helps to resist bacteria and tighten skin pores to protect the skin from damage. Baking soda exfoliates the skin to reduce redness caused by pimples and thus boosts blood circulation.
Mix baking soda and honey together in equal proportions to obtain a cohesive paste. Apply the mixture on the skin and make sure to leave it for 15 minutes, then wash with water.
Baking soda bath:
Baking soda bath helps you detoxify the body because it provides the necessary nutrients. Add two cups of salt to a cup of baking soda in the bath with stirring. Soak the body in the bath for 30 minutes, then wash the skin with warm water. You can add 1/4 cup of cornstarch.
Apple cider vinegar and baking soda:
Apple cider vinegar exfoliates the dead layers of the skin. Mix 2 tablespoons of apple cider vinegar and apply the paste on the skin and leave it for 15 minutes before washing with cold water, followed by warm water and leaving the face to dry on its own. You can repeat this process once or twice a week. If you have sensitive skin, it is preferable to reduce the amount of apple cider vinegar used in the mixture.
Baking soda and hydrogen peroxide:
Hydrogen peroxide is an effective facial cleansing ingredient if you want to remove acne quickly because it kills bacteria quickly and is therefore used as a cleanser. The combination of baking soda and hydrogen peroxide enhances the healing process and provides acne-free skin. Then apply the paste on the face gently and leave it on the face for 5 minutes only. Then clean the face with cold water. When you use this mixture once a week, you can get glowing and youthful skin.
Baking Soda and Moroccan Clay:
Clay has medicinal properties for treating acne to help you reduce the appearance of pimples and improve skin texture, so try this remedy from today right away. At first, the face is washed well with a mild soap containing salicylic acid. Exfoliate the skin with a pad and dry the skin with a soft towel. Now take 1 tablespoon of baking soda, add water to make a smooth paste. Gently apply the paste on the acne for 3-4 minutes. Then wash the face with lukewarm water. Cover your face with a small spoonful of mud. Leave it on the face for 20 minutes to dry. Then wash the face with hydrogen peroxide to avoid any kind of infection, then wash the face directly with lukewarm water.
Beauty benefits of baking soda:
Dry skin treatment:
If you have dry skin and suffer from flaking skin, you can use baking soda in your water bath, it will do wonders for you. In fact, experts recommend using baking soda to treat skin disorders. Because baking soda raises the pH of the water, it exfoliates the skin. You can soak the body in a baking soda bath to balance the acidity of the water, preferably 3 times a week.
Soothe itchy skin:
Do you suffer from chicken pox, insect bites, and similar skin problems, all of these disorders result in terrible itching in the skin, but there is no need to worry. Add a little baking soda to the bath water to work on itchy skin.
Cleaning inflamed skin:
Baking soda has anti-inflammatory and antibacterial properties, which makes it a great cleanser for the skin. In fact, experts recommend using a baking soda solution to clean your eyelids if you suffer from blepharitis, an eye disorder. People who suffer from this condition need to clean the eyelids regularly and prevent the growth of germs and secretions that accumulate in the edges of the eyelids. To make an eyelid cleaning solution, you can mix baking soda with sterile water and use it to rinse your eyelids.
Peeling:
Exfoliation helps you remove the outer layer of dead skin and can make a big difference in the appearance of your skin, but you do not need to buy exfoliating products and you can rely on home recipes such as using a simple paste of water and baking soda can work wonders for your skin and get rid of dead cells to get smooth skin. It is preferable to exfoliate the skin once or twice a week.
Get glowing skin:
Do you suffer from dull and dark skin? One of the common treatments to get rid of this problem includes the use of baking soda and lemon juice to exfoliate the top layer of dead and dark skin. Because lemon is rich in vitamin C, which prevents the interaction of melanin. Therefore, this combination is thought to be great for your skin and to rinse off after about 10 minutes.
Fabric softening:
Do you have high cracks on the heels of the feet? Baking soda can be a useful ingredient to get rid of when soaking the feet in a baking soda solution, as it dilutes the special calcinones and then using a pumice stone directly to remove the dead layer of the skin.
Dealing with sweaty skin:
If you are wary about the chemicals in antiperspirants because they may not suit your skin, baking soda can be a good alternative. Not only does it have antibacterial properties, but it also helps in dealing with odor-causing bacteria and absorbing sweat, thus leaving you feeling clean. Baking soda can be directly applied to the armpits or even mixed with talcum
Face massage with pictures
Massage or facial massage increases the ease of blood circulation in the facial muscles, which gives vitality, strength and activity to your skin permanently. It also reduces wrinkles and the effects of aging on the skin of the face. It is also very useful in the case of feeling tension and pressure, which makes you feel some comfort and relaxation.
Method 1: Massage for a more lively face:
1. Start by cleaning the skin: you should start the massage with the implementation of your daily routine, by cleaning the face using a medical cleanser with a little oil for dry skin and lukewarm water, then drying the face well
2. Choose a useful skin oil:
Using some skin oil, move your fingertips on the face skin to gently distribute the oil to lighten the pores and give some shine and vitality to the face skin. One of the best oils to use is almond, jojoba or argan oil.
** Argan or almond oil for dry skin
** Jojoba oil for oily and medium skin
** If you are worried about using oil, you can use one of your favorite natural moisturizers
3. Start the massage from the lymphatic area:
Many of the toxins that must be removed from the face are deposited in the lymph nodes, which are located on both sides of the neck and behind the ear. Use your fingertips to massage the lymph nodes in a circular motion for a minute
** Massage in a wide circular motion from behind the ear to the throat and then up from the throat to behind the ear again
** In this movement you need some stability, but do not be too harsh in this movement as the facial massage is different from the normal muscle massage because it is more sensitive
4. Side Facial Massage:
Massage the sides of the face in wide circular motions on both sides of the face through the jaw and do not neglect the corners of the mouth. Make sure to massage the face up and out, not down, for one minute
5. Forehead massage:
Massage in a wide circular motion on both sides of the forehead at the same time using both hands. Start near the temples and gradually move towards the middle of the forehead and then come back out again and continue for one minute
6. Massage the eye area:
Place your fingers on the arch of the eyebrows and pull them out, then slowly move under the eyes, bringing your fingers to the inner corner of the eye. Keep going up again through the nose to reach the arch of the eyebrows again and repeat for 1 minute
**Massaging the eye helps to avoid puffiness and improves blood circulation around it, which avoids dark circles
** Try to use a larger amount of massage oil in this area to avoid damage to sensitive skin
7. The last step is to massage each part separately again to revitalize the skin and give it vitality and luster.
The second method: lifting and fixing massage:
1. Apply a light layer of massage oil:
The oil helps to glide your fingers smoothly on the skin without causing damage to it. It also moisturizes the skin, makes it more vibrant and reduces the appearance of wrinkles.
** For dry skin use coconut or argan oil
** For medium skin, use almond or jojoba oil
** For oily skin, use jojoba oil or any other moisturizer of your choice
2. Massage near the sides of the mouth:
A lifting and firming massage is done on the areas that may hang down, using your fingertips. Make small circular motions on either side of the corners of the mouth with a little pressure to help lift this area and hold for one minute.
3. Cheeks massage:
Make circular motions on your cheeks to help lift them and get rid of their wrinkles while pressing lightly on the cheekbones while pulling them out and then back again and continue this for a minute,
4. Massage the eye area:
Put your fingers on the arch of the eyebrows and then pull them outward until you reach the outer corner of the eyes, then lightly move them under the eyes, then stop at the inner corner to curse, then slowly move up the eyebrows again through the corners of your nose and repeat for a minute
**Massaging the eyes helps to lift the skin under the eyes and avoid sagging
** Use more oil to avoid doing any damage
5. Forehead massage:
If your forehead contains horizontal lines and you want to reduce their depth, you should massage against the direction of the spread of these lines and not with them. Place your hands next to each other in an upright position with your forehead fingers touching. Do the zigzag movement by moving one hand up and the other down and continue this movement on both sides of the forehead for a minute
6. Massage between the eyebrows:
The vertical lines that spread between the eyebrows can be reduced in depth when massaged horizontally. Place your fingers horizontally on this area and start pulling it back and forth for a minute
7. The last step is to massage each part again separately.
Method 3: Relaxation Massage:
1. Apply a light layer of oil to the face:
As in each time of the first and second methods, a little oil should be applied to improve the movement of the massage
2. Massage below the ears and along the throat:
Tension and pressure always make the throat and neck area stiff so use your fingertips to make circular motions for one minute to massage the neck and jaw area
3. Side Facial Massage:
Use wide circular strokes. Massage the sides of the throat by passing to the sides of the mouth and into the temples, and don’t forget the cheekbones. Try to close your eyes and focus on feeling relaxed with every movement of your hand.
4. Temple and forehead massage:
Tension always leads to headaches, so it’s best to use some massaging motions to get rid of the headache. Use circular motions to massage the temples at the same time. Gradually move to the middle of the forehead and then come back out and continue for a minute.
5. Massage the eye area:
Put your fingers on the arch of the eyebrows and then pull them outward until you reach the outer corner of the eyes, then lightly move them under the eyes, then stop at the inner corner to curse, then slowly move up the eyebrows again through the corners of your nose and repeat for a minute
**Massaging the eyes helps to lift the skin under the eyes and avoid sagging
** Use more oil to avoid doing any damage
6. Nose massage:
Just massage the upper area of the nose in a circular motion to avoid a sinus headache
7. The last step is to repeat the above as a final step in each region separately.
Take care of your face with natural products
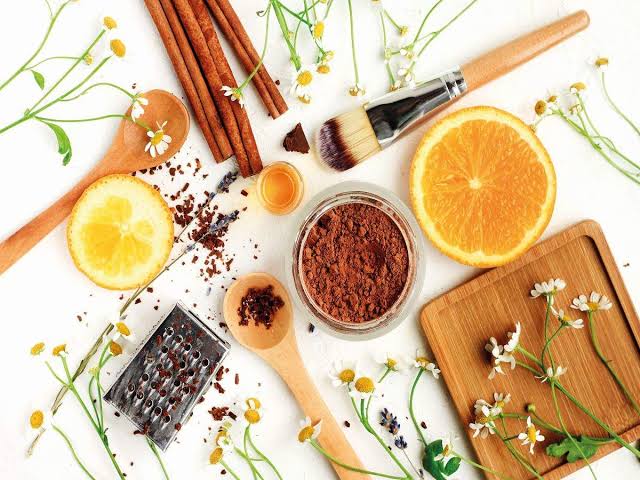
We must never forget to take care of our skin, this very sensitive organ which covers our entire body. It is for this reason that it must be taken care of. It is not only a question of aesthetics, but a question of health. This time around, we’re going to focus on how to cleanse your face, that area known to be so delicate.
We don’t have to go to a beauty salon, nor do we have to use expensive chemicals to cleanse and brighten our facial skin. We can carry out a beauty treatment directly at home with totally natural products.
It is true that cleaning your face is an essential hygienic activity for our body. But it’s not just about that: it’s also a great way to rejuvenate our skin. We suggest you follow different steps to achieve a simple, natural and effective cleaning!
Open the pores
First, wash the skin of the face with lukewarm water and mild soap. Once we have removed all the surface impurities accumulated during the day, we can open our pores. This is a fundamental step, because it serves to prepare the ground before applying our mask to cleanse the skin. Indeed, the well-freed pores allow our skin to perfectly absorb the products that we will apply thereafter.
We can heat a pot of water until it boils. Then we remove it from the heat, and all that is left is to add an herb such as lavender, chamomile or green tea. Immediately after, we bring our face to the container and we cover our head with a towel, which allows the vapors to be received directly on our face. Two to five minutes will be more than enough for the skin to perspire well.
Exfoliation or peeling
During this step, we will eliminate the dead cells embedded in the skin. We will also promote cell regeneration. Exfoliation, or peeling, also allows us to eliminate scars, prevent the appearance of flaking and promote circulation in the skin. It should always be done once the skin is well cleansed and the pores are open. Skipping steps is not recommended. We can perform this peel using various homemade recipes:
Almond peel: We mix the following ingredients, then we will keep everything in a clean glass container. This will allow us to apply our treatment several times, for example once a week.
.- ½ cup of sea
salt.-½ teaspoon of pure almond extract
.- ½ cup of coffee beans
.- ½ cup of coarse brown sugar
.- ½ cup of sweet almond oil
Coconut and chocolate peel: Mix the oil well with the sugar and the extracts, until you obtain a homogeneous substance. You will then have to add the coconut powder and keep everything in a container ready for use.
.- ½ cup of coconut oil
.- 3 teaspoons of pure cocoa powder, no added sugar
.- 1 cup of brown sugar
.- ½ teaspoon of pure coconut extract
.- 1 teaspoon vanilla extract coffee
Lemon and almond peel : Avoid contacting this mixture with liquid substances. We will have to prepare it before washing our face with it, and we will stir everything with our fingers just before using it.
.- ½ teaspoon of lemon zest
.- ½ cup of sea salt
.- ½ cup of sweet almond oil
When applying exfoliators to our face, it is very important to do it gently. It is necessary to make a circular massage on all the skin of our face, by carrying out a light pressure. We will use an antiseptic cotton for makeup. In this way, we remove all the dirt present as well as the dead cells. We can therefore continue our natural treatment after this step.
We can let the paste act for about 20 minutes, then wash our face again with lukewarm water. Right after, we can remove the pimples and blackheads present on our skin from our skin. This is the only right time to do it, because in other cases we would risk damaging our skin and therefore causing infections.
Once our skin is well cleansed, exfoliated and free of impurities, we can apply a natural face mask. The mask will correspond to the personal needs of each one. There are masks to moisturize dry skin, others to remove excess sebum, or to eliminate spots. There are others to close pores and others that are used to fight the appearance of wrinkles.
We can apply the mask until the product becomes quite dry. Or if not, we can use the same method as the one followed during the peel, i.e. leave the mask on for 20 to 30 minutes, then rinse off with lukewarm water. It is best to then dry the skin by patting it gently.
There are natural masks that are very easy to make and apply. What is more, they are very effective. Here are a few :
Anti-wrinkle mask: We mix in a container a cup of seedless cucumber pulp and a raw egg. We apply the mask all over the skin of our face, then we leave it on for at least half an hour.
PH Restoring Mask: We use a packet of gelatin, as well as a cup of tomato pulp. We heat the gelatin and then add the tomato pulp until a compact paste is obtained. Once everything has cooled, we apply it all over our face and let it act for about twenty minutes. This is the time it takes for the tomato to rebalance the pH while the gelatin tones our skin.
Moisturizing mask : The mask is done using half an avocado mashed, two spoons of honey and two eggs. We beat the eggs until stiff, then we add the other two ingredients. Once the mixture looks like a thin paste, we apply it to our skin. In addition to hydrating our skin, avocado will help us eliminate scars and hyperpigmentation. We must leave the mask on our face for at least half an hour.
As you can see, it doesn’t take much to make a homemade mask! The great advantage is that these masks are completely natural and therefore do not present any contraindications. The masks will leave your face smooth and your skin soft. Remember to remove the mask with lukewarm water and gently dab your skin to dry it.
Close the pores
Once the cleansing is finished, the ideal is to close the pores. In this way, we avoid seeing them fill with impurities. We can do this by applying frozen water to our face, for example by melting some ice cubes. If the mask contains tomatoes or cucumbers, then you do not need to do this, as they themselves close the pores on our face.
There are other products that can help close pores, such as green tea, mint, or apple cider. These ingredients all have astringent properties. We apply them to our skin by moistening our face with a towel, then we just have to wait for the product to dry. Afterwards, we can rinse our face with cold water.
Skin care
Once the cleaning is finished, it must last over time. It is therefore very important to properly hydrate our skin, because it should neither be too dry nor too oily. For this, it is recommended to use a moisturizer adapted to our skin and its specificities. In this way, we will prevent dryness, itching and even aging of the skin. We need to hydrate our skin on a daily basis to keep it smooth and soft.
We can also make our own anti-wrinkle moisturizer for very dry skin ourselves. This homemade remedy can be stored in the refrigerator for at least three months. But it is better not to wait so long, because the benefits of the cream are especially effective the first days, just after having done it. The ingredients are as follows:
– 25 g of cucumber puree
– 25 g of blueberry water
– 25 g of jojoba oil
– 25 g of grape seed oil
– 25 g of rose essential oil
Just mix all the ingredients in a rather large container. The mixture will have to be beaten well, until the oil integrates perfectly with the water and other products.
Store the mixture in a glass jar. You can now start applying it on a daily basis to benefit from its virtues from day one.
It is advisable to apply it when you get out of the shower or the bath, that is to say when the skin is clean and the pores open. Thus, the wonderful effects of our cream will penetrate more easily into our skin!
The best simple natural means to exfoliate the face
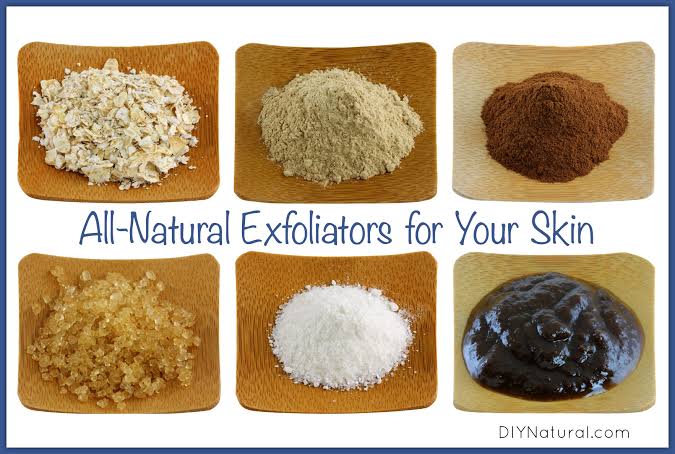
Learn about the best, simple and effective natural ways to exfoliate the face.
– Sugar
Mix 5 teaspoons of granulated sugar with a little water and stir for one minute to get a homogeneous mixture. The mixture is used to rub the face in circular motions for a few minutes, then rinse well with lukewarm water after that.
– Honey
Use honey to gently rub the facial skin in circular motions for a few minutes. This helps in the smoothness and freshness of the skin. Honey is one of the best natural ways to take care of your skin, repeat it twice a week to get better results.
Mix a cup of oats, 3 tablespoons of yogurt with a few drops of honey to get a homogeneous mixture. Use the mixture on the face for a few minutes, then rinse well.
– Lemonade
Lemon juice helps remove dead skin instantly. Use fresh lemon juice to gently rub your skin in circular motions for one minute, then rinse. But make sure not to deal with the skin violently, as it is not recommended to apply this to sensitive skin. This may cause redness of the skin and a feeling of itching.
– coffee
Mix the coffee powder with a little sea salt and a few drops of water or any of the natural oils well. Use the mixture to rub the face skin well, then rinse after a few minutes with cold water. 7- Sea salt
Sea salt is one of the best natural ways to exfoliate dry skin. Mix sea salt with a little glycerin to get a homogeneous mixture. The mixture is also used to scrub the skin of the face and body.
– Yogurt
Yogurt is one of the best ways to exfoliate and calm the skin as well, making it suitable for sensitive skin. Use yogurt to rub the face skin well in circular motions for one minute, then rinse well. This also helps to soften the skin and restore its freshness.Important tips when exfoliating the skin:
– Make sure to exfoliate the face regularly once a week to maintain healthy and fresh skin.
Avoid rough handling of the skin while exfoliating it, as this may damage your skin.
The sunscreen should be used regularly to protect the skin from the harmful effects of the sun’s rays.
– After exfoliating the skin, use a gentle moisturizer to keep your skin soft and supple.
Always exfoliate your skin in circular motions using fingertips for best results.
If you suffer from dry skin, it is recommended to replace water with natural oils when preparing natural skin scrubs.